The Ultimate Guide to Removing Text Overlays From Images for Designers

Removing text overlays from an image can transform its usability and visual appeal. For designers, this process is crucial when repurposing images for new projects or improving their overall design quality. Studies show that images with less than 20% text perform better in Facebook ads, proving the value of clean, text-free visuals. Advanced tools, like convolutional neural networks, now assist in removing text from videos, showcasing the progress in this field. Whether you're working on a digital ad or a creative project, mastering this skill ensures your image stands out with clarity and purpose.
Key Takeaways
Taking text off images makes them easier to use and look better. This is important for designers.
Tools like Photoshop and GIMP let you edit carefully. But they need practice and skill to use well.
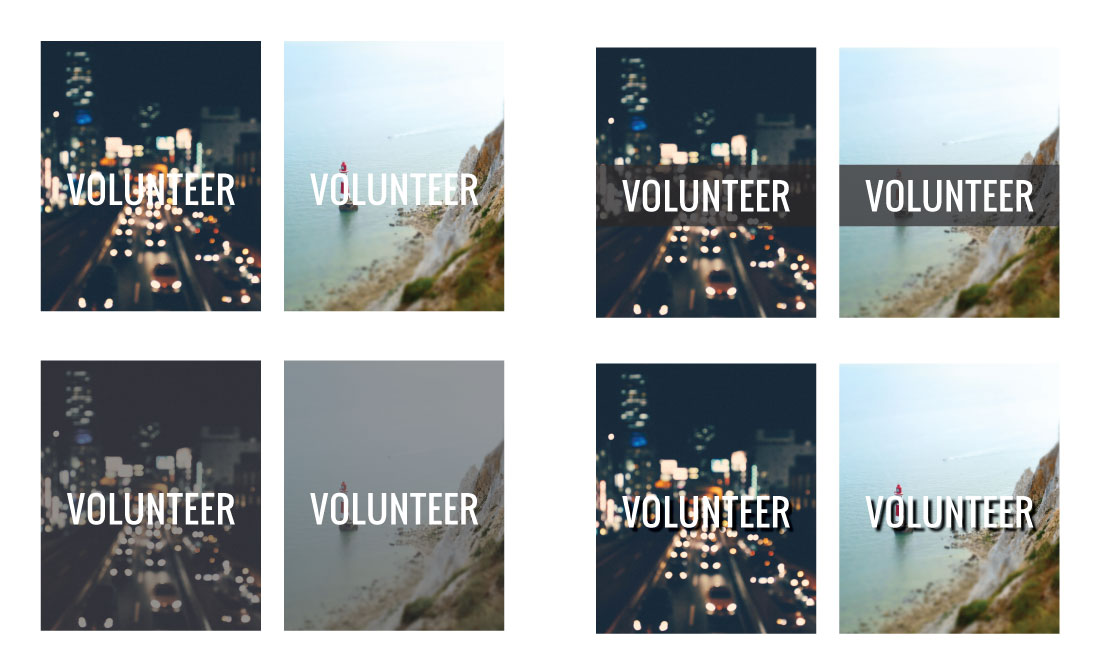
AI tools like WatermarkGONE make removing text faster and easier. They also keep the image looking good.
Apps like Snapseed and TouchRetouch are handy for editing on your phone. They work for different needs.
Pick the best tool based on your project. Think about how accurate, fast, and simple it is to use.
Manual Methods to Remove Text Overlays
Removing a text overlay manually gives you complete control over the process. This approach works well when you want precision or need to edit specific areas of an image. Let’s explore two popular tools—Photoshop and GIMP—and how you can use them to remove text layers effectively.
Using Photoshop for Text Removal
Adobe Photoshop is one of the most powerful tools for editing images. To remove a text overlay, follow this step-by-step guide:
Open Your Image: Launch Photoshop and load the image containing the text overlay.
Select the Clone Stamp Tool: From the toolbar, choose the Clone Stamp Tool. This tool lets you copy pixels from one part of the image and apply them over the text layer.
Adjust the Brush Settings: Set the brush size and hardness to match the area you’re editing. A softer brush works well for blending.
Sample the Background: Hold the Alt key (Option key on Mac) and click on a clean area near the text. This action samples the background pixels.
Paint Over the Text: Carefully paint over the text overlay, replacing it with the sampled pixels. Work in small sections for better accuracy.
Refine the Edits: Use the Healing Brush Tool to smooth out any inconsistencies and ensure the image looks natural.
Photoshop’s advanced tools allow you to remove text overlays with precision. However, this method requires practice and attention to detail.
Removing Text Overlays with GIMP
GIMP (GNU Image Manipulation Program) is a free alternative to Photoshop. It offers similar functionality for removing text layers. Here’s how you can do it:
Open the Image in GIMP: Start by loading your image into GIMP.
Use the Clone Tool: Select the Clone Tool from the toolbox. It works similarly to Photoshop’s Clone Stamp Tool.
Set the Source Point: Hold the Ctrl key and click on a clean area near the text overlay. This action sets the source point for cloning.
Paint Over the Text: Carefully paint over the text layer, replacing it with the sampled background. Adjust the brush size as needed for precision.
Smooth the Edits: Use the Heal Tool to blend the edited area seamlessly with the rest of the image.
GIMP provides a cost-effective way to remove text overlays, making it a great choice for beginners or those on a budget.
Pros and Cons of Manual Methods
Manual methods for removing text overlays offer several advantages, but they also come with challenges. Here’s a quick breakdown:
Pros | Cons |
|---|---|
Full control over the editing process | Time-consuming for large projects |
High precision for detailed edits | Requires skill and practice |
Works well for complex backgrounds | May not preserve image quality perfectly |
Tip: Use manual methods when you need precise control or are working with intricate designs. For simpler tasks, consider automated tools to save time.
By mastering these manual techniques, you can confidently remove text overlays and enhance your design projects.
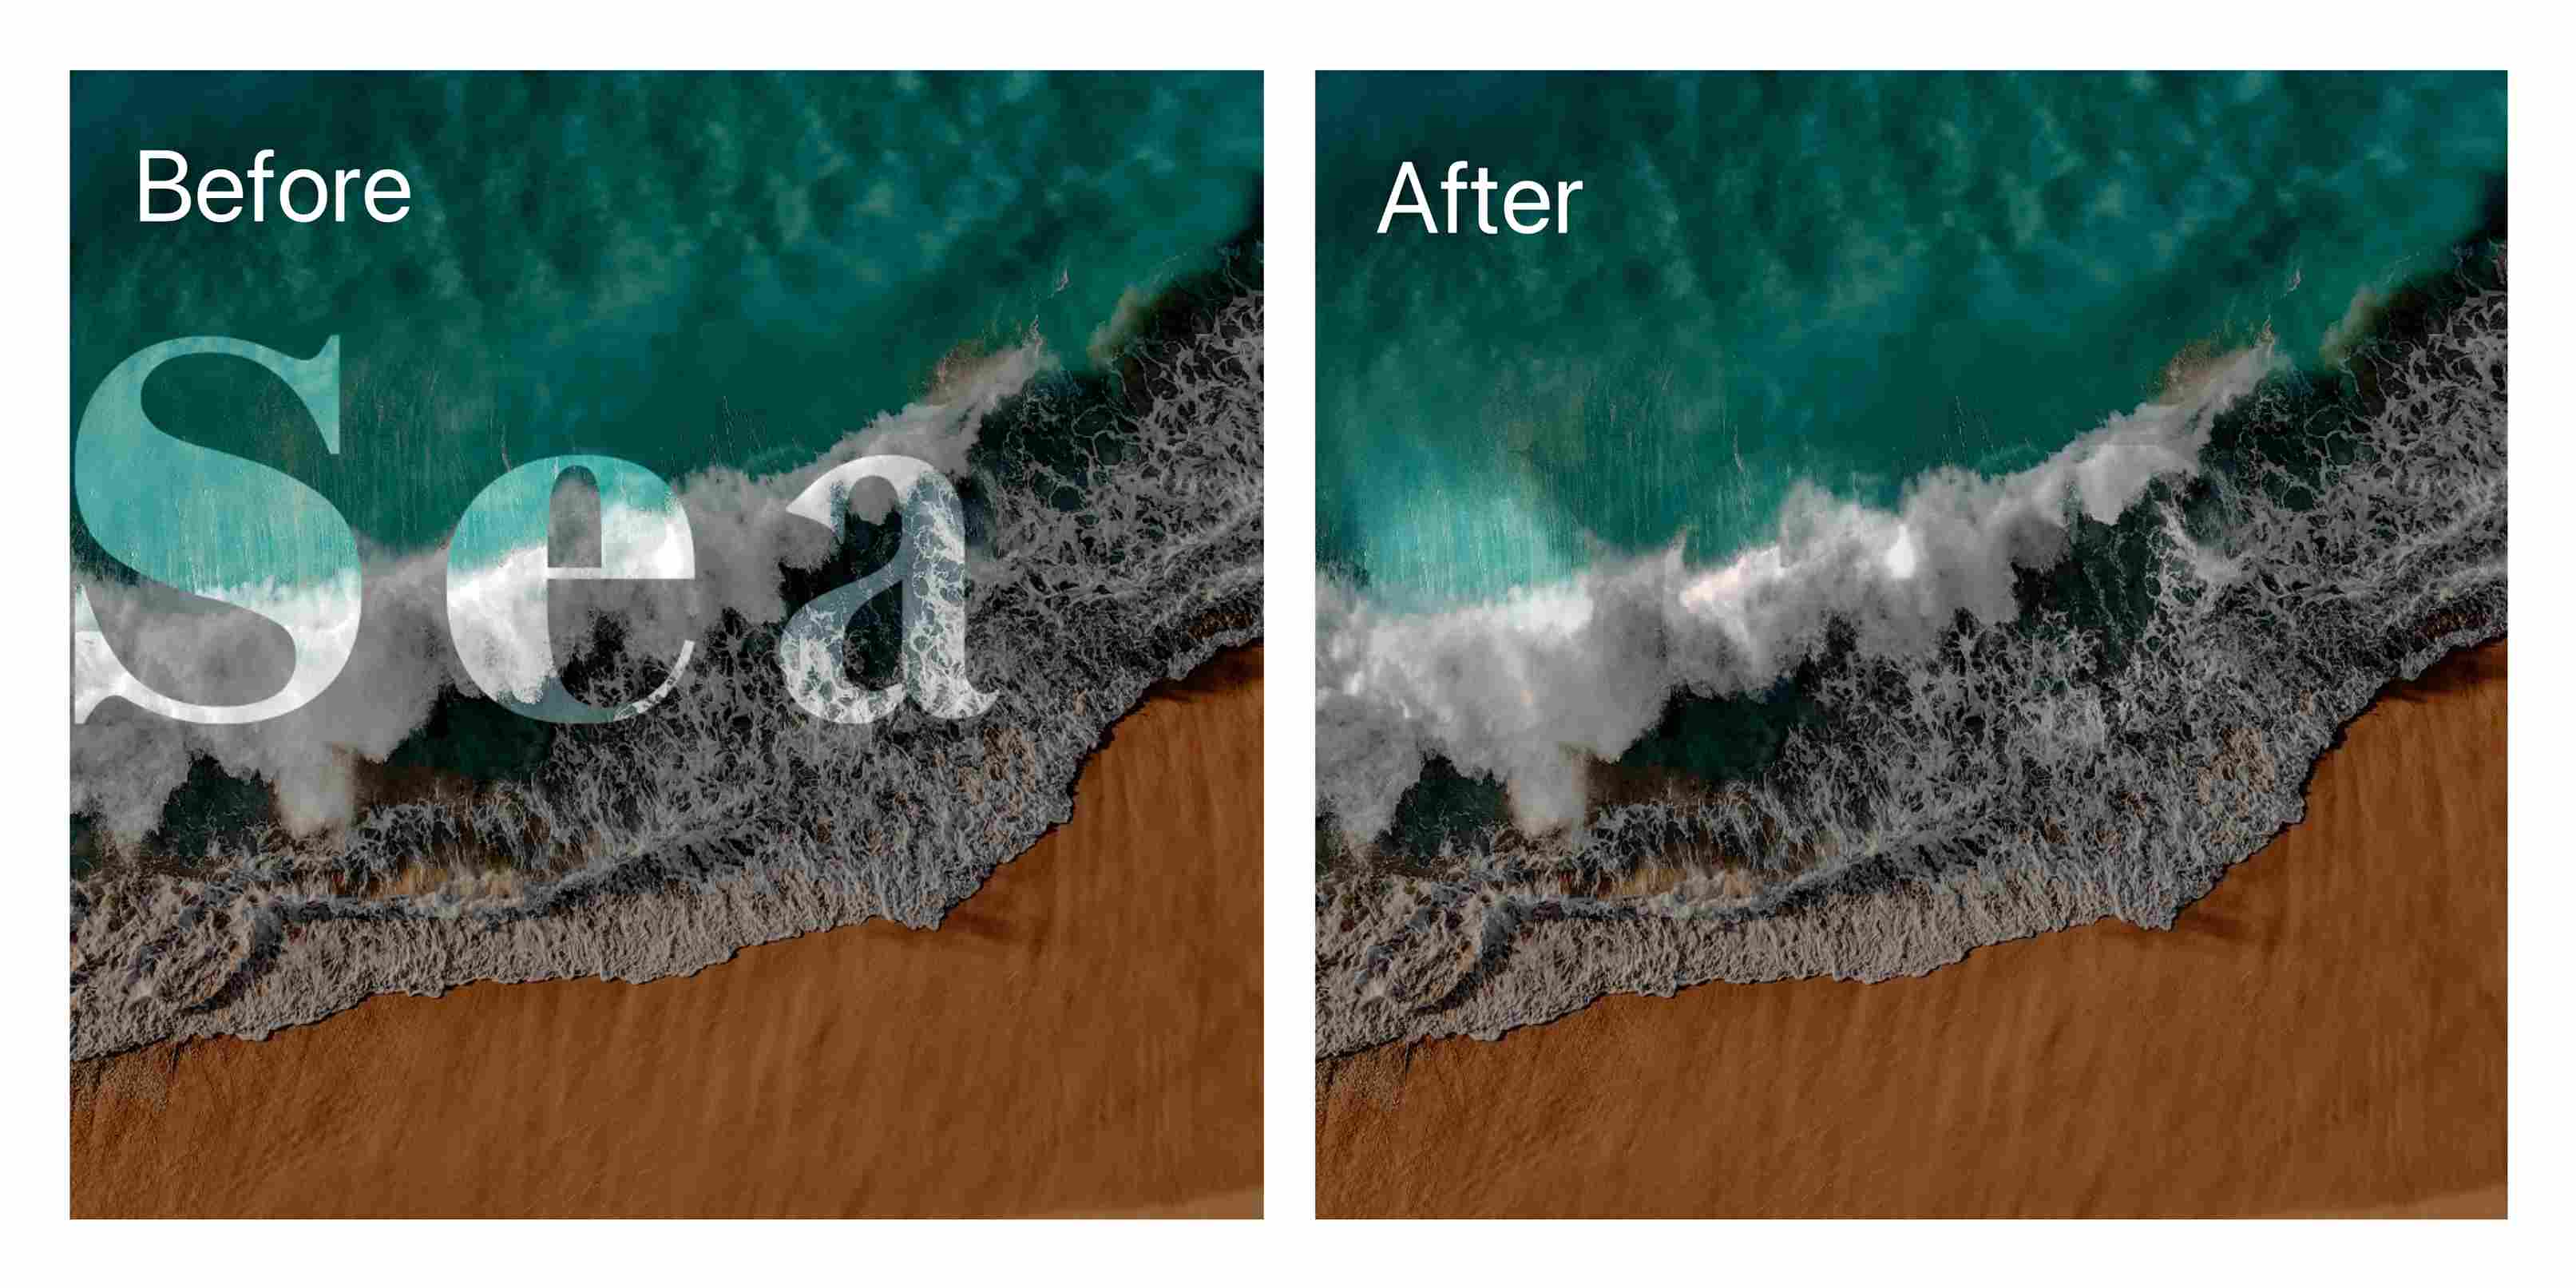
AI-Powered Tools to Remove Text Overlays

AI-powered tools have revolutionized the way you can remove a text overlay from an image. These tools simplify the process, offering speed and accuracy while maintaining the quality of your design. Let’s explore some of the most effective AI-driven solutions available today.
How Cleanup.pictures Simplifies Text Removal
Cleanup.pictures is a powerful online tool that uses AI to help you remove text overlays effortlessly. Its intuitive interface makes it easy to use, even if you’re not a professional designer. Here’s how it works:
Upload Your Image: Start by uploading the image containing the text layer you want to remove.
Select the Brush Tool: Use the brush tool to highlight the text overlay. The tool automatically detects the area you’ve marked.
AI-Powered Removal: The AI processes the image and removes the text layer seamlessly, leaving the background intact.
Download the Edited Image: Once the process is complete, download your clean, text-free image.
Cleanup.pictures is ideal for quick edits and works well for simple backgrounds. However, it may struggle with complex designs or intricate text overlays.
Tip: Use Cleanup.pictures when you need a fast and straightforward solution for removing text overlays from images with minimal details.
Why WatermarkGONE is the Ultimate Solution for Designers
When it comes to seamless text removal, WatermarkGONE sets itself apart as the ultimate solution for designers. Its advanced AI technology ensures you can remove text overlays with unmatched precision and efficiency.
Here’s how WatermarkGONE compares to other tools:
Feature | WatermarkGONE | Competitors |
|---|---|---|
Image Quality Preservation | High | Varies |
Exceptional | Moderate to Low | |
Handling of Complex Designs | Excellent | Limited |
User-Friendly Interface | Yes | Varies |
Batch Processing Capability | Yes | Limited |
WatermarkGONE offers a simple three-step process. First, upload your image. Next, let the AI detect and remove the text layer while preserving the original quality. Finally, download your edited image in seconds. The tool also supports batch processing, allowing you to remove text overlays from multiple images simultaneously. This feature saves you time and effort, especially when working on large projects.
Callout: WatermarkGONE is designed for professionals and casual users alike. Whether you’re editing high-resolution images or standard formats, this tool delivers exceptional results every time.
By choosing WatermarkGONE, you gain access to a reliable, efficient, and secure solution for removing text overlays. Its commitment to quality and user satisfaction makes it a top choice for designers.
Mobile Apps for Text Overlay Removal
Mobile apps provide a convenient way to remove text overlays from images, especially when you're on the go. These tools are designed to simplify the editing process while maintaining the quality of your design. Let’s explore two popular apps—Snapseed and TouchRetouch—and compare their features to help you choose the best option.
Removing Text Overlays with Snapseed
Snapseed, developed by Google, is a versatile photo editing app that works well for removing text overlays. Its intuitive interface makes it accessible for beginners and professionals alike. To remove a text overlay, you can use the Healing tool, which allows you to replace unwanted text with surrounding pixels. This feature works best on simple backgrounds where the text doesn’t overlap intricate details.
Snapseed also offers advanced editing options like selective adjustments and filters, enabling you to enhance your image further after removing the text. The app supports high-resolution images, ensuring your edits look professional. If you need a free and reliable tool for quick edits, Snapseed is an excellent choice.
Using TouchRetouch for Mobile Editing
TouchRetouch stands out for its exceptional ability to remove text overlays and other unwanted elements from images. Its healing and cloning tools are particularly effective, allowing you to edit with precision. The app’s simple touch interface makes it easy to select the area you want to edit. With just a few taps, you can remove text overlays seamlessly, even from complex backgrounds.
This app is ideal for designers who need a mobile solution for detailed edits. It preserves the quality of your image while ensuring the edited area blends naturally with the rest of the design. TouchRetouch’s user-friendly approach and powerful features make it a top choice for mobile editing.
Comparing Mobile Apps for Designers
When choosing a mobile app to remove text overlays, consider your specific needs. Snapseed offers a free, beginner-friendly solution with basic tools for removing text and enhancing images. On the other hand, TouchRetouch provides advanced capabilities for more intricate edits, making it suitable for professional designers.
Feature | Snapseed | TouchRetouch |
|---|---|---|
Cost | Free | Paid |
Ease of Use | Beginner-Friendly | Intuitive |
Advanced Editing Tools | Limited | Extensive |
Handling Complex Designs | Moderate | Excellent |
Both apps excel in their own ways. Snapseed is perfect for quick, straightforward edits, while TouchRetouch shines in handling detailed and complex designs. Evaluate your project requirements to decide which app aligns best with your goals.
Best Practices for Text Overlay Removal
Tips for Maintaining Image Quality
Maintaining image quality is essential when you remove a text overlay. Following specific guidelines can help you achieve professional results. First, leverage non-destructive editing techniques like layers and masks. These methods preserve the original data, allowing you to make adjustments without compromising the image. Second, work in high resolution during edits. This approach ensures precise results and allows you to scale down later for web use. Third, use AI tools to streamline repetitive tasks, such as background removal. These tools save time and improve readability by maintaining consistency across your designs.
Batch processing is another effective strategy. Apply uniform edits to multiple images to create a cohesive style. Additionally, choose the right image format for your editing needs. For example, PNG works well for preserving transparency, while JPG is ideal for smaller file sizes. Finally, optimize your image outputs to reduce file size while maintaining quality. This step ensures your images load quickly without sacrificing readability.
Choosing the Right Tool for Your Needs
Selecting the right tool to remove a text layer depends on your project requirements. If you need precision and control, manual tools like Photoshop or GIMP are excellent choices. These tools allow you to edit intricate designs and handle complex text overlays. For quick and straightforward edits, AI-powered tools like WatermarkGONE offer unmatched efficiency. They simplify the process and maintain image quality, even for high-resolution files.
Mobile apps like Snapseed and TouchRetouch are perfect for on-the-go editing. Snapseed is beginner-friendly, while TouchRetouch excels in handling detailed edits. Evaluate your needs, such as the complexity of the text layer and the desired output quality, to choose the most suitable tool.
Common Mistakes to Avoid
Avoiding common mistakes ensures your text overlay removal process is smooth and effective. One frequent error is over-editing, which can distort the image and reduce readability. Always aim for subtle edits that blend seamlessly with the background. Another mistake is using low-resolution images for editing. Low resolution limits your ability to make precise adjustments and affects the final quality.
Failing to document your editing process can also lead to inconsistencies. Keep track of your steps to maintain uniformity across multiple images. Additionally, avoid neglecting ethical considerations. Ensure your edits align with professional guidelines and do not misrepresent the original content. By following these tips, you can remove text overlays effectively while preserving the integrity of your design.
Removing a text overlay from an image has never been easier with the variety of tools available today. You can choose manual methods like Photoshop or GIMP for precise control, AI-powered tools for speed and efficiency, or mobile apps for convenience. Each option offers unique benefits, so selecting the right one depends on your expertise and project needs.
For designers seeking a reliable and efficient solution, WatermarkGONE stands out. It excels in preserving image quality, handling complex designs, and adapting to various watermark styles. Users consistently report superior results compared to other tools.
Feature | WatermarkGONE | Other Tools |
|---|---|---|
Image Quality Preservation | High | Variable |
Handling Complex Designs | Excellent | Limited |
Adaptability to Watermark Styles | Advanced | Basic |
WatermarkGONE ensures your image remains intact during text overlay removal.
It works seamlessly with both simple and intricate designs.
Thousands of users trust it for professional results.
By choosing WatermarkGONE, you can simplify your workflow and achieve flawless, text-free images effortlessly.
FAQ
How can I remove text overlays without losing image quality?
Use tools like WatermarkGONE or Photoshop. These tools preserve the original quality while removing text overlays. Always work with high-resolution images to ensure the final output looks professional.
Are AI-powered tools better than manual methods for text removal?
AI tools like WatermarkGONE simplify the process and save time. They work well for most images, especially those with simple backgrounds. Manual methods offer more control but require skill and patience.
Can mobile apps handle complex text overlays effectively?
Apps like TouchRetouch excel at removing text overlays from intricate designs. They provide advanced tools for detailed edits, ensuring the image looks natural. Snapseed works better for simpler tasks.
What is the best tool for batch processing multiple images?
WatermarkGONE is ideal for batch processing. Its AI technology removes text overlays from multiple images simultaneously, saving time and maintaining quality across all files.
How do I choose the right tool for text overlay removal?
Consider your project needs. For precision, use Photoshop or GIMP. For speed, opt for AI tools like WatermarkGONE. Mobile apps work best for quick edits on the go.
See Also
Eliminating Clear Watermarks Without Blurring The Background
A Comprehensive Guide To Erasing Logos From Images
Common Errors To Avoid While Erasing Photo Watermarks
© 2024 WatermarkGONE • All rights reservedbuild with WatermarkGONE